


Views: 0 Author: Site Editor Publish Time: 2025-08-09 Origin: Site


When I pick a monitor mount, I always think about my workspace, how much I move my monitor, and how easy the installation feels. Wall monitor mounts help me clear up desk space and give my setup a modern, organized look. Desk monitor mounts, like a monitor arm or a simple monitor stand, let me adjust my monitor for better comfort and an ergonomic fit. I notice people like fully adjustable monitor arms for ergonomic reasons, while some stick with a monitor stand for fixed setups. I find it smart to consider ergonomics, monitor size, cost, and how a monitor mount fits with my monitor and space.
Choose a monitor mount that fits your workspace, monitor size, and how often you adjust your screen for comfort.
Wall mounts free up desk space and create a clean, modern look but need drilling and a strong wall.
Desk mounts offer great adjustability and flexibility, making them ideal for frequent monitor movement and sit-stand desks.
Always check your monitor’s weight, size, and VESA pattern before buying a mount to avoid compatibility issues.
Use a checklist to plan installation, adjust your monitor for good posture, and manage cables for a neat workspace.
When I set up my workspace, I always think about how my monitor affects my posture. I want to avoid neck and back pain, so I look for ways to keep my screen at eye level. Both wall and desk monitor mounts help me do this. I notice that when my monitor sits too low or too high, I start to slouch or crane my neck. That’s when discomfort creeps in.
Occupational health experts say that keeping the monitor at the right height helps prevent strain on my neck, shoulders, and back. I’ve learned that a good monitor mount lets me line up my screen with my natural line of sight. This simple change makes a big difference in my daily comfort. I feel less tired at the end of the day, and my back thanks me for it.
If I use a monitor stand, I get some height, but not much flexibility. Wall mounts give my desk a clean look and free up space, but they usually stay in one spot. I find that both options support ergonomic comfort, but the level of adjustability can vary.
Tip: Always check if your monitor is at eye level when you sit or stand. This small habit can boost your ergonomic comfort and help you avoid aches.
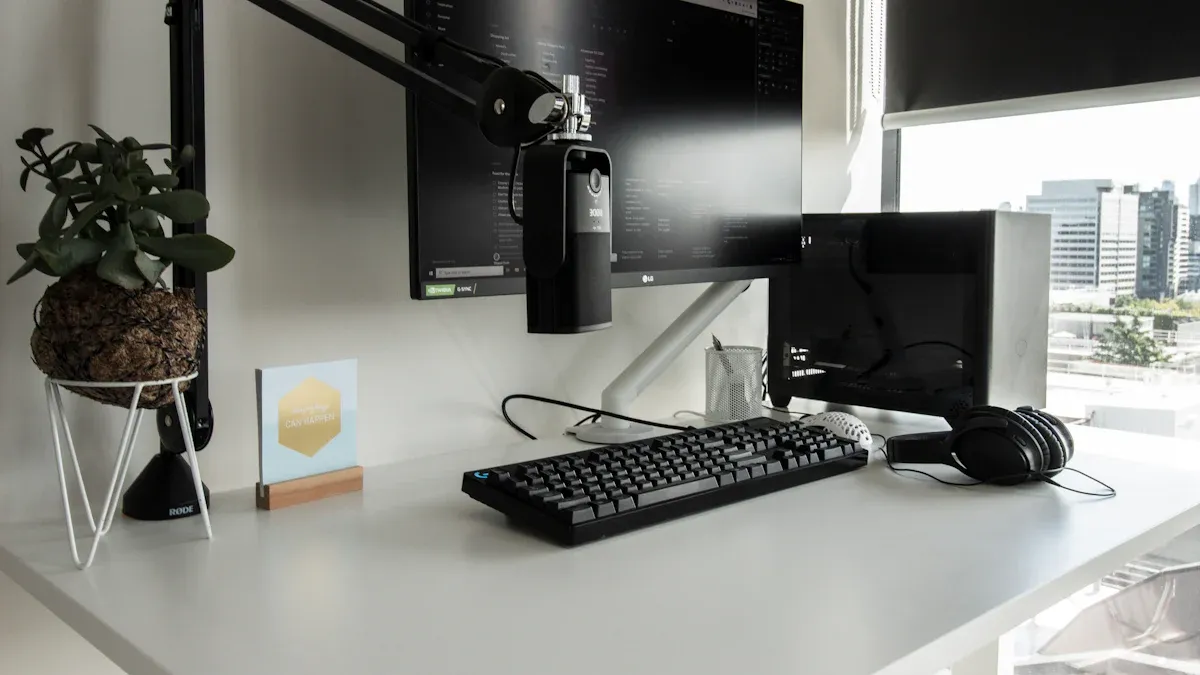
I love using a monitor arm because it gives me more control over my setup. I can tilt, swivel, and raise my monitor until it feels just right. This adjustability means I can switch between sitting and standing without losing ergonomic comfort. Sometimes, I even move my monitor closer or farther away, depending on what I’m working on.
A monitor arm lets me fine-tune the angle and height, which helps me keep a healthy posture. I notice that when I have this kind of adjustability, I don’t have to twist or lean forward. My comfort level goes up, and I can focus better on my tasks.
Here’s a quick list of what I adjust with my monitor arm:
Height for eye-level viewing
Tilt to reduce glare
Swivel for sharing my screen
Distance from my eyes for less strain
A monitor arm gives me the flexibility I need for true ergonomic comfort. I think it’s a great choice if you want to personalize your workspace and keep your body happy.
When I switched to a wall mount for my monitor, I noticed my desk felt much bigger. I could finally use the whole surface for writing, drawing, or spreading out my notes. The monitor floated above my desk, so I had nothing blocking my workspace. This setup made my room look cleaner and more organized. I liked the extra space for my keyboard, mouse, and even a cup of coffee.
Wall mounts work great if you want to maximize space efficiency. I found that by moving my monitor off the desk, I could fit more items or just enjoy a clutter-free area. Sometimes, I even used the extra space for a second monitor or a small plant. If you have a small desk or want a minimalist look, a wall mount can really help.
Tip: Wall mounts are perfect for tight spaces or shared work areas where every inch counts.
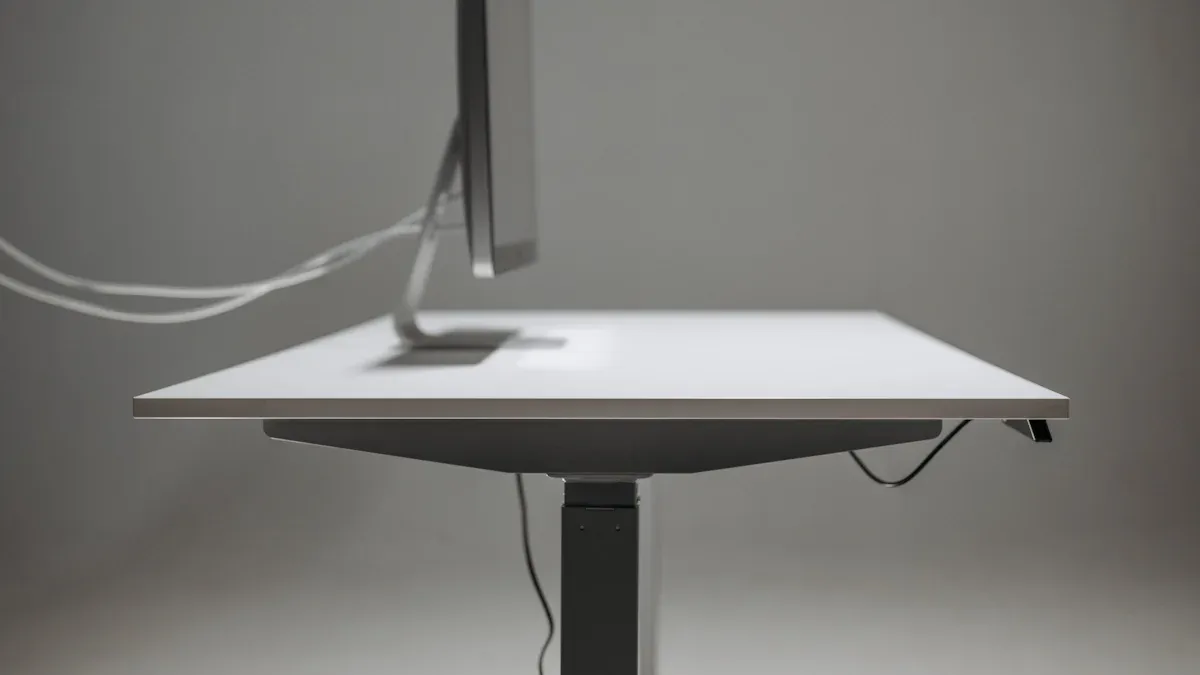
When I used a desk mount, I still saved space, but in a different way. The monitor arm attached to the back or side of my desk, lifting the monitor off the surface. This gave me more room underneath for books or supplies. I liked being able to push the monitor back when I needed more desk space or pull it closer for detailed work.
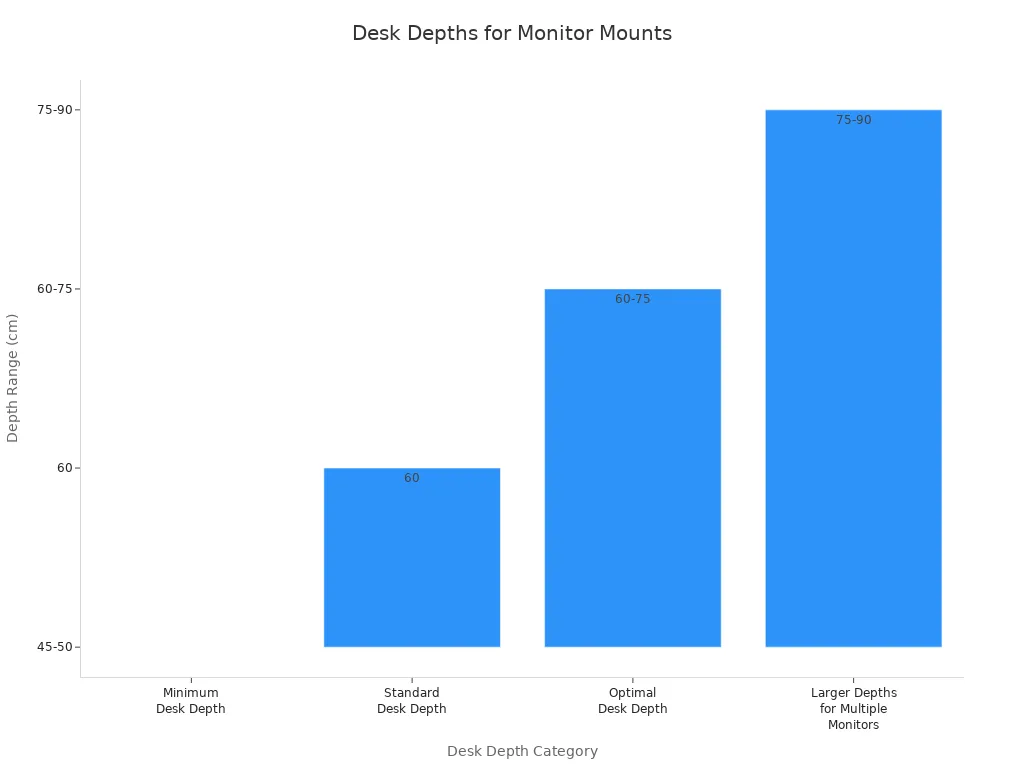
Before I installed my desk mount, I checked if my desk was deep enough. Here’s a quick table I used to figure out what works best:
Desk Depth Category | Depth Range (cm) | Depth Range (inches) | Notes |
|---|---|---|---|
Minimum Desk Depth | 45 - 50 | 17.7 - 19.7 | Space-saving but may not be ideal for extensive setups. |
Standard Desk Depth | ~60 | 23.6 | Sufficient for most office tasks and monitor setups. |
Optimal Desk Depth for Computer Use | 60 - 75 | 23.6 - 29.5 | Provides ergonomic comfort and enough space for monitor, keyboard, and mouse. |
Larger Depths for Multiple Monitors | 75 - 90 | 29.5 - 35.4 | Recommended for multitasking and creative work involving multiple monitors and tools. |
I learned that most desk mounts don’t need a specific desk width, but I always make sure my desk can handle the monitor’s weight. The mount should support the monitor size and be VESA compliant. I like how a desk mount lets me adjust my monitor’s position, which helps me keep my workspace flexible and tidy.
When I installed my first wall monitor mount, I realized it took a bit more planning than I expected. I had to find a wall stud to make sure the mount could hold my monitor safely. Drywall alone just doesn’t cut it for heavy screens. I grabbed my stud finder and marked the spot. Then, I used a hammer drill and the right drill bits to make holes for the plastic anchors. I attached the mounting plate to the back of my monitor with screws and washers. Before tightening everything, I used a spirit level to check that the mount was straight. Once I felt confident, I tightened all the screws.
I ran into a few common problems along the way. Sometimes, my monitor didn’t fit the mount because of VESA compliance issues. I learned to check if my monitor had the right mounting holes before starting. Cable management also became a challenge. Without a plan, cords can get messy fast. I started using cable ties and wraps to keep everything neat.
Here’s a quick table of the most common wall mount challenges I faced and how I solved them:
Installation Challenge | Description | Impact on Wall Monitor Mounts | My Solution |
|---|---|---|---|
Monitor Weight Incompatibility | Mount can't handle monitor weight, causing sagging. | Monitor won't stay in place. | I chose a mount rated for my monitor's weight. |
Monitor Size Incompatibility | Ultra-wide monitors may not fit standard mounts. | Limited tilt and stress on mount. | I picked a heavy-duty mount for my wide monitor. |
VESA Compliance Issues | Monitor lacks standard mounting holes. | Can't attach to mount. | I used an adapter bracket that fit my monitor. |
Cord and Cable Management | Cables get tangled or cluttered. | Messy workspace and possible cable damage. | I used cable ties and wraps to organize cords. |
Tip: Always double-check your monitor’s weight and VESA pattern before drilling any holes.
Setting up a desk mount felt easier for me. I didn’t need to drill into the wall, which made the process less stressful. I checked that my desk was thick and sturdy enough to support the monitor and the mount. Some mounts clamp onto the edge, while others use a grommet that fits through a hole in the desk. I liked having both options, depending on my desk setup.
Here’s what I usually gather before starting:
The right monitor mount for my monitor’s size and weight
A screwdriver set
Screws and washers (usually included)
A spirit level to keep things straight
I attached the mounting plate to the back of my monitor, then fixed the arm to my desk. I made sure the clamp or grommet was tight and secure. After that, I slid the monitor onto the arm and adjusted it until it felt just right. I always check that the cables reach and don’t get pinched.
Note: If your desk is thin or made of soft material, add a support plate or choose a lighter monitor.
I found that desk mounts are great for renters or anyone who wants to avoid wall damage. The whole process took me less than an hour, and I could move the mount later if I changed my desk setup.
When I started shopping for a wall mount, I noticed the prices could vary a lot. Some basic wall mounts cost less than a fancy lunch, while others get more expensive if they offer extra features. I found that most wall mounts for a single monitor fall in the $28 to $48 range. Here’s a quick table of what I saw:
Product Description | Price Range (USD) |
|---|---|
ErgoReach ED5 Premium Pivoting Aluminum Wall Mount | $28.95 |
Thin Client PC Monitor Mount (Heavy-Duty VESA Bracket) | $29.95 |
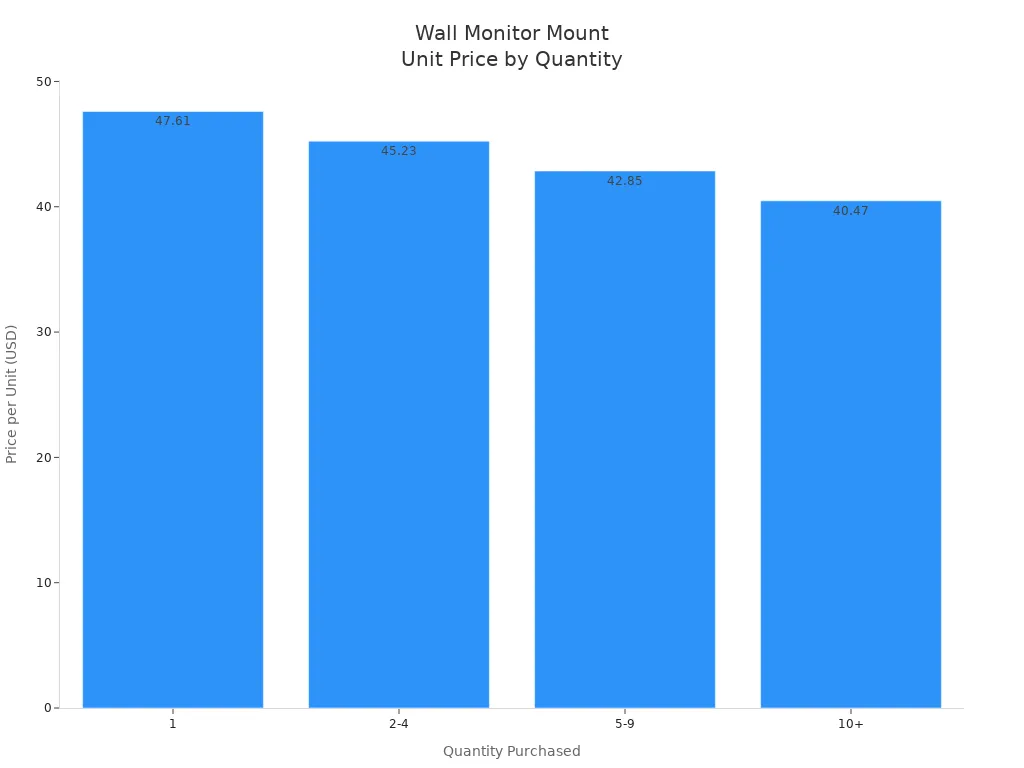
If I wanted to buy more than one wall mount, I saw that some sellers offered discounts. For example, buying two or more could save me up to 15% per unit. That made a big difference when I set up a multi-monitor workspace.
Quantity Purchased | Price per Unit (USD) | Discount |
|---|---|---|
1 | $47.61 | None |
2-4 | $45.23 | 5% off |
5-9 | $42.85 | 10% off |
10+ | $40.47 | 15% off |
I always check if the wall mount includes all the hardware. Sometimes, I need to buy extra screws or anchors, which adds a few dollars to the total. For a single monitor, I usually spend less than $50 for a solid wall mount.
Tip: If you plan to mount more than one monitor, look for bundle deals to save money.
When I switched to a desk mount, I noticed the price range felt similar to wall mounts. Basic desk mounts for a single monitor start around $30. If I want a monitor arm with more adjustability, the price can go up to $70 or more. I like to compare features, such as tilt, swivel, and cable management, before I decide.
Desk mounts sometimes come with extra parts, like a grommet kit or cable clips. I find that these extras can make the setup easier and keep my workspace tidy. If I want to mount two monitors on one arm, the price jumps, but I still think it’s worth it for the flexibility.
I always check the weight limit and VESA compatibility before I buy. Spending a little more for a sturdy mount saves me from headaches later. For most single monitor setups, I spend between $30 and $70, depending on the features I want.
Note: Desk mounts are easy to move, so I don’t mind paying a bit more for one that lasts.
When I look at my workspace, I want it to feel clean and modern. Wall monitor mounts help me get that look. I see my monitor floating above the desk, which makes the whole area feel less crowded. I have tried a few different styles. Some wall mounts use a track system, like the ViewTrack horizontal rails. These let me slide one or more monitors anywhere along the track. I like this because I can set up a multi-monitor workspace that fits my needs.
Articulating monitor arms on the wall give me even more flexibility. I can tilt, swivel, or move my monitor to the perfect spot. Sometimes, I want to stand while working. Height-adjustable wall workstations, like the LeverLift Snap system, let me move my monitor and keyboard up or down in seconds. I find this great for switching between sitting and standing.
Here are some features I notice with popular wall monitor mounts:
VESA compatibility for most monitors
Support for single or multiple monitors
Customizable placement along a track
Options for ergonomic adjustability, like tilt and swivel
I do not see many color or finish choices, but the design always looks sleek and professional. My friends often comment on how tidy my setup looks with a wall mount.
Tip: If you want a minimalist look, a wall-mounted monitor can make your desk feel bigger and less cluttered.
Desk monitor mounts also help me keep my workspace neat, but in a different way. When I use a monitor arm that clamps to my desk, I can lift my monitor off the surface. This gives me more room for my keyboard, mouse, and even a monitor stand if I want to add a second screen.
I like how desk mounts come in different shapes and sizes. Some have a simple arm, while others have two arms for dual monitors. The metal finish usually matches my other desk gear, so everything feels coordinated. I can push my monitor back when I need space or pull it forward for close-up work.
Here’s a quick table comparing the look of wall and desk monitor mounts:
Feature | Wall Mount | Desk Mount |
|---|---|---|
Desk Clutter | Minimal | Low |
Adjustability | High (with articulating arms) | Very High |
Multi-Monitor Support | Yes (track systems) | Yes (dual/triple arms) |
Style | Sleek, modern | Modern, techy |
I think both options look great, but the choice depends on what style fits your space. If you want a floating monitor, go for the wall mount. If you like moving things around, a desk mount might suit you better.
When I choose a monitor mount, I always check if my monitor matches the mount’s requirements. The first thing I look for is the VESA pattern. Most monitors have four holes on the back in a square or rectangle. If my monitor does not have these holes, I need a special adapter. I also pay close attention to the weight limit. If my monitor is too heavy, the mount might sag or even break. Here’s a table I use to compare typical weight limits:
Mount Type | Typical Weight Limit (lbs) | Notes |
|---|---|---|
Desk Monitor Mount | Up to 17.6 - 20 | Curved screens up to 13.4 lbs |
Wall Monitor Mount | Up to 26.5 |
I have run into a few common problems when setting up my monitor. Sometimes, my monitor is too wide for the mount, or the tilt does not work well. Other times, I find out my monitor is not VESA compliant. Here are the most common issues I have faced:
Monitor weight does not match the mount’s capacity.
Monitor size is too large or too wide for the mount.
Monitor lacks VESA mounting holes.
Cables get messy without good cable management.
Tip: Always check your monitor’s weight, size, and VESA pattern before buying a mount. This saves time and frustration.
I always think about where I want to place my monitor. Wall mounts work best when I have a strong wall with studs. Drywall alone cannot hold a heavy monitor. I use a stud finder to make sure the wall is safe. Desk mounts need a sturdy desk. If my desk is thin or made of soft wood, I use a support plate or pick a lighter monitor.
Some desks have a grommet hole, which makes mounting easier. If not, I use a clamp. I also check if my workspace has enough room for the monitor to move and adjust. For small desks, a wall mount frees up space. For flexible setups, a desk mount lets me move my monitor around.
Note: Not every desk or wall can handle every monitor mount. I always double-check before I start the installation.
When I choose between a wall mount and a desk mount for my monitor, I always run through a checklist. This helps me avoid mistakes and makes sure my setup works well for my space and needs. Here’s the step-by-step list I follow:
Check monitor compatibility
I look at the back of my monitor for the VESA pattern and check the weight. I make sure the mount supports both the size and weight of my monitor. If my monitor doesn’t have VESA holes, I look for an adapter.
Pick the right spot
I decide where I want my monitor. I place it at eye level and about an arm’s length away. This keeps my neck straight and helps me avoid strain.
Prepare tools and workspace
I gather a screwdriver, drill, stud finder, level, and measuring tape. For a wall mount, I always check for wall studs. For a desk mount, I check the desk thickness and edge shape.
Mark and measure
I mark the drill points carefully. For wall mounts, I use pilot holes to avoid wall damage. For desk mounts, I check that the clamp or grommet fits my desk.
Test stability
Before I attach my monitor, I test the mount’s stability. I make sure it doesn’t wobble or sag.
Adjust for comfort
I use the mount’s tilt, swivel, and height features to get the best viewing angle. I want my monitor to move easily but stay in place.
Manage cables
I use cable ties or clips to keep cords neat. This keeps my workspace clean and safe.
Tip: I always double-check the weight and VESA pattern before I start. This saves me from headaches later.
Here’s a quick table to help you remember what to check:
Step | What I Do | Why It Matters |
|---|---|---|
Compatibility | Check VESA and weight | Prevents sagging or damage |
Location | Place at eye level, arm’s length | Supports good posture |
Tools | Gather drill, screwdriver, level, etc. | Makes installation easier |
Marking | Mark drill points, check desk/wall strength | Ensures safe and accurate setup |
Stability | Test before attaching monitor | Keeps monitor secure |
Adjustability | Use tilt, swivel, height features | Improves comfort and ergonomics |
Cable Management | Use ties or clips | Reduces clutter and mess |
I’ve seen a lot of different setups, and I know that everyone’s workspace is unique. Here are some common situations I’ve run into, along with what worked best for me:
Small desk, crowded workspace
My desk felt cramped with a monitor stand. I switched to a wall mount and freed up a ton of space. My desk looked cleaner, and I had more room for my keyboard and notes.
Frequent monitor adjustments
I like to move my monitor around during the day. A desk mount with an adjustable arm made this easy. I could tilt, swivel, and pull the monitor closer or push it back when I needed more space.
Shared or sit-stand desk
When I shared my workspace or used a sit-stand desk, I needed to adjust the monitor height often. A desk mount with a smooth height adjustment worked best. I avoided wall mounts in this case because they were harder to move.
Heavy or ultra-wide monitor
My ultra-wide monitor was too heavy for some desk mounts. I checked the weight limit and picked a heavy-duty wall mount. This kept my monitor stable and safe.
Modern, professional look
I wanted my home office to look sleek. A wall mount gave my monitor a floating effect and made my space look more professional. The built-in cable management kept everything tidy.
Desk with glass or thin surface
My glass desk couldn’t handle a clamp. I used a wall mount instead, which worked perfectly and kept my monitor secure.
Note: I always check for enough space behind my desk before installing a mount. Some arms need extra room to move, and I don’t want my monitor bumping into the wall.
I’ve learned that the right mount depends on my monitor, desk, and how I like to work. If I want a flexible setup, I go with a desk mount. If I need more space and a clean look, I pick a wall mount. No matter what, I always follow my checklist to avoid common mistakes and get the most out of my monitor setup.
When I look back at my monitor setup journey, I see that the right choice depends on my space, how often I move my monitor, and how permanent I want things. Here’s a quick table that helped me compare:
Comparison Point | Wall Monitor Mounts | Desk Monitor Mounts |
|---|---|---|
Installation | Needs drilling; more permanent | Easier, flexible options |
Space Efficiency | Frees up desk space | Uses some desk space |
Adjustability | Great for multiple monitors | Good, but depends on mount type |
Desk Compatibility | Works with any desk | Some desks may not fit a mount |
Aesthetics | Clean, floating monitor look | Visible on desk, can be bulkier |
Cost | Often pricier | Usually more affordable |
I always ask myself these questions before picking a monitor mount:
Do I want my monitor to stay in one spot or move around?
Is my desk strong enough for a monitor mount?
Will my monitor fit my workspace and style?
No matter which monitor mount I choose, I use my checklist and think about my daily routine. I know I can create a setup that feels just right for me!
I always check if my monitor has VESA mounting holes and fits the weight limit. Most modern monitors work with standard mounts. If my monitor does not have VESA holes, I look for an adapter. I never skip this step.
I have to drill into the wall for a wall mount. This leaves holes behind. If I rent, I ask my landlord first. I use anchors and find a stud to keep my monitor safe. I patch holes later if I move.
I use cable ties, clips, or sleeves to keep monitor cables neat. Sometimes, I run cables behind the wall or along the desk edge. This makes my workspace look tidy. I always plan cable routes before mounting my monitor.
I can switch, but I need to remove the desk mount and patch any marks. Then, I install the wall mount. I check my monitor’s compatibility with both mounts. I keep all hardware in case I want to change again.
I avoid clamping a monitor mount to glass or thin desks. Instead, I use a wall mount or a heavy base stand. I want my monitor to stay secure. Safety comes first, so I always test stability before use.


